If you're planning a bathroom renovation or adding plumbing to a space without gravity-fed drainage, you may be considering a macerator system. But one common question often comes up:
🧐 “Does the macerator have to be installed right behind the toilet?”
The short answer is not necessarily—but it depends on how you're using the macerator.
In this guide, we'll explain when placing the unit behind the toilet is recommended, when it's optional, and how to ensure a smooth, code-compliant installation no matter where the macerator goes.
🪜 What Is a Macerator and Why Placement Matters
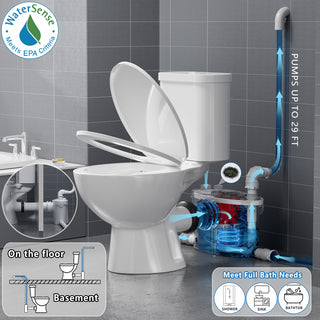
A macerator is a type of pump that grinds and moves waste water from toilets or other bathroom fixtures to the main plumbing system—especially useful in areas below or far away from your home’s main drain line. These units allow you to install bathrooms in basements, garages, attics, or any place without natural gravity drainage.
Depending on what the macerator is connected to—a toilet or other grey water sources like sinks and showers—the recommended installation location will vary.
🚽 When the Macerator Is Connected to a Toilet: Common & Recommended Positions Behind the Toilet
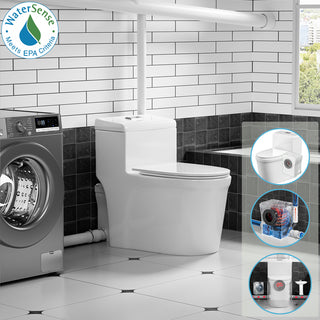
When used with a toilet, macerators are generally positioned behind the toilet, but that doesn’t always mean “immediately attached.” In fact, there are two common and acceptable configurations:
🟢 1. Directly Behind and Attached to the Toilet Outlet
This is the most typical and straightforward installation method, where the macerator unit is mounted directly behind the toilet and connects to the rear outlet.
Advantages:
- Simplified setup with minimal pipework
- Clean, efficient gravity flow into the pump
- Minimal footprint—ideal for bathrooms with limited space
| For example, here’s how to put the Simple Project upflush macerator directly behind the toilet:

Just slide the rubber sleeve onto the toilet’s rear outlet and tighten it with the included stainless steel clamp—it’s that simple. For added leak protection, you may also wrap the toilet outlet with Teflon tape and apply sealant as needed.
Things to keep in mind:
- While this setup appears “flush,” you’ll still need to leave a small amount of space between the wall and toilet to accommodate the unit
- Always review your product's installation manual to ensure compatibility with your bathroom layout
🟡 2. Slightly Behind Using an Extension Pipe
In some layouts, the macerator is installed a short distance away from the toilet, using an extension pipe to bridge the connection. It might be hidden inside a recessed cavity behind the toilet, behind a false wall, or tucked into a nearby utility area.
 Advantages:
- Cleaner visual aesthetic, especially in modern bathrooms
- Better sound isolation from pump noise
- Increased access space for future maintenance
Things to keep in mind:
- Keep the extension distance short—ideally within 2 feet (check manufacturer specs)
- Ensure the toilet’s outlet is positioned above or level with the macerator’s inlet for proper gravity flow
- Use sealed, properly sloped piping to avoid backflow or clogs
- Not all models support this setup—consult the product manual before proceeding
🧼 When the Macerator Is Not Connected to a Toilet: Placement Becomes Flexible
If your macerator is only used to handle grey water—from sinks, showers, bathtubs, or laundry machines—the installation location becomes much more flexible.
Here are some smart placement options:
✅ Under a Sink Cabinet
Perfect for vanity sinks or utility areas. The unit can be concealed inside the cabinet, out of sight but still easily accessible.

* The image shows the Saniflo Sanivite and is for demonstration purposes only.
✅ In a Recessed Floor or Corner
For basement or sloped-floor installations, placing the unit in a slightly lowered area can help with flow while staying unobtrusive.
✅ Behind a False Wall or Inside a Utility Shaft
Many modern bathrooms hide macerators behind an access panel or inside a wall cavity. Just make sure to leave room for servicing.
| As long as gravity can carry grey water into the pump and it can discharge effectively to the main line, location is up to you.
📋 What Do Building Codes and Manufacturers Say?
There’s no universal rule that says a macerator must be behind the toilet. However, local plumbing codes and individual product manuals may impose guidelines on:
- Maximum pipe length and slope
- Air venting and electrical access
- Minimum clearance for maintenance
- Compatibility with toilet types or fixture heights
To ensure compliance and safety, always check your local regulations and follow the manufacturer’s instructions.
💡 Professional Tips for a Smooth Installation
Whether your macerator is directly behind the toilet or elsewhere, follow these best practices for optimal performance:
- Leave access space: Don’t box in the unit—install a removable panel or leave room for inspection
- Maintain proper pipe slope: Gravity-fed pipes should slope toward the pump, and a check valve can help prevent backflow
- Use compatible fittings: Stick with the manufacturer’s connection kits for best sealing and function
- Ensure electrical safety: Use GFCI-protected outlets, confirm voltage compatibility, and avoid moisture-prone connections
🧩 Conclusion: Not Always Behind—But Always Thoughtfully Placed
So, do macerators have to be behind the toilet?
No—they don’t have to be.
If your macerator is connected to a toilet (rather than just a sink or shower), placing it directly behind the toilet outlet—or as using a short extension pipe—is typically the most dependable approach.
And if you’re only pumping grey water? You have even more freedom to place the macerator wherever it fits your design and drainage plan.
Want a compact and flexible macerator system for your next bathroom project? Explore our recommended models for tight spaces and modern designs.


