


Installing a toilet might not be as difficult as you think. While many people choose to hire a professional plumber, DIY enthusiasts will find this a rewarding challenge. Follow these steps to make the task manageable!
Difficulty: Beginner
Time: 30 minutes
Cost: $0
Tools You'll Need:
- Adjustable wrench
- Screwdriver
- Hacksaw
- Rubber gloves
- Silicone sealant (optional)
Step-by-Step Guide:
1. Check Your New Toilet
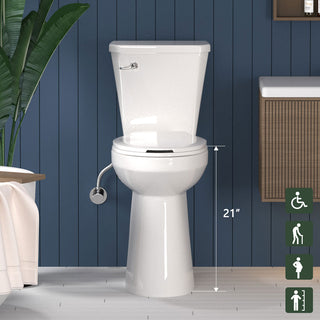
Ensure the new toilet is in good condition, suitable for your bathroom, and all parts are included. For example, our two-piece 21" tall toilet with single flush typically includes all necessary components:
Note:
- For one-piece toilets, the bowl and tank are integrated, eliminating the need for additional assembly. This makes the installation process much simpler.
- Dual-flush toilets come with a dual-flush button instead of a lever.
2. Remove the Old Toilet
Please kindly refer to our another detailed blog: A Step-by-Step Guide to Removing an Old Toilet. Here, we will continue to learn how to install a new toilet.
3. Install the New Toilet
1)Replace the Toilet Bolts
Ensure the toilet flange is in good condition, then place the new toilet bolts(also called closet bolts) from your new toilet into the flange slots.

2)Attach the Wax Ring
Place the new wax ring onto the toilet’s drain outlet.

3)Secure the Toilet Bowl
Carefully lift the toilet bowl, align the bolts with the mounting holes and the outlet with the flange, then press down and rock it gently to secure the toilet and prevent leaks.

Note:
- Toilets are typically made of ceramic, which can be easily damaged by drops or impacts. Therefore, you may need a helper to lift and align the toilet.
- Once placed, don’t remove the toilet to prevent breaking the seal.
Tighten the nuts evenly with a wrench. Please tighten them alternately with a wrench to avoid uneven pressure that could cause cracking.

Saw off the excess bolt length and cap the bolts for a neat appearance and to reduce oxidation.
Note:
- Be sure to clean up any metal shavings with a cloth or vacuum cleaner.
4)Install the Tank
Place the fill valve, flush valve, and tank-to-bowl bolts through the holes on the toilet tank bottom.

Use washers and nuts to secure them. Ensure all rubber gaskets are correctly placed to prevent leaks.

Note:
- For some tanks with pre-installed fittings, you may not need to perform this step.
- The anti-leak gasket at the bottom of the fill valve is already pre-installed. However, you need to manually ensure that the black rubber gasket on the flush valve and the mounting bolts are securely fixed to prevent leaks from the bottom of the tank.
5)Install the Flush Handle
Insert the provided flush handle through the pre-drilled hole in the tank. Attach the flapper chain to the end of the flush handle lever. This lever will lift the flapper, allowing the toilet to flush.

Note:
- Ensure there is adequate space between the flush handle, fill valve, and flush valve to avoid interference during flushing.
Secure the refill tube between the fill valve and the flush valve to maintain the water level in the toilet bowl.

Place the tank lid on top.
6)Connect the Water Supply Line
Attach one end of the supply line to the fill valve and the other to the shutoff valve. Turn on the water.

Note:
- Toilets generally do not come with a supply line. You will need to purchase a braided supply line from a hardware store or online, ensuring it is the appropriate length and has the correct fittings for your toilet.
- Ensure that the inlet valve's connection matches the size of your supply line to prevent leaks. For example, our toilets include a 7/8" connector to easily match your local supply lines.
7)Attach the Seat and Lid
Generally, the toilet seat and lid come as a single unit and are secured to the toilet bowl with bolts, washers, and nuts.

Note:
- Before fully tightening the nuts, make sure to align the edges of the seat with the bowl for proper installation and a more comfortable fit.
8)Test the Flush
For a newly installed toilet, we recommend flushing it 2-3 times to ensure there are no leaks around the tank base, water supply line, or the toilet bowl base. If needed, you can seal the base of the toilet with caulk.

With that, the installation of your new toilet is complete. After reading this, we hope you’ll feel confident in assessing whether you are ready to take on the challenge of installing a new one yourself!
5. When to Hire a Professional Plumber?
1) If you don't feel confident about ensuring the toilet won't leak or a proper installation after reading the entire process.
2) If you find it difficult to lift the toilet.
3) If you think the whole procedure is too cumbersome and prefer to hire a professional.
We totally get that everyone has their own way of doing things! Whether you're a DIY enthusiast or prefer to call in the pros, our only expectation is that your bathroom ends up with a toilet that meets your needs.
For more tips and assistance, feel free to contact us or check our how-to series for more practical advice!