

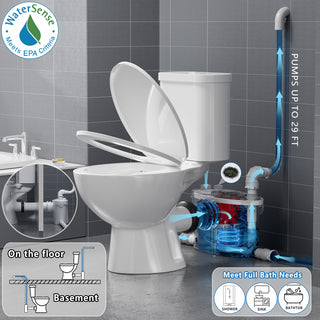
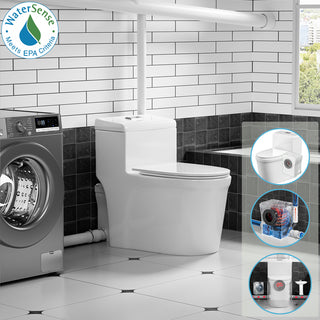


A macerator pump makes it possible to install a toilet almost anywhere in a home — basement bathrooms, loft conversions, garage additions — by grinding waste into a fine slurry and pumping it through narrow pipes to the main drain. It's a clever piece of engineering, and like most mechanical systems, it performs best when it's kept clean.
Over time, mineral deposits, organic residue, and limescale can build up inside the pump chamber. Left untreated, this causes slow flushing, unpleasant odours, longer pump run times, and eventually, more serious mechanical problems.
The good news is that cleaning a macerator pump requires no special tools, no plumbing knowledge, and takes less than an hour. This guide covers the complete process: how to clean the pump step by step, how to descale it in hard-water areas, which products to avoid, how often to clean it, and what the warning signs look like when a clean is overdue.
What Does a Macerator Pump Do?
Before diving into the cleaning process, it helps to understand what's actually happening inside the unit.
A macerator pump sits behind or below the toilet pan and contains a sealed chamber with rotating blades. When the toilet is flushed, waste and water enter the chamber, where the blades shred the solids into a fine slurry. An internal pump then forces that slurry through a small-bore pipe to the main soil stack or drain.
Because the pump handles warm, organic waste and operates in a confined space, it's naturally prone to odour-causing bacteria and scale accumulation. Macerator pumps from reputable brands are built to last 10 to 15 years, but only when maintained correctly. The number one cause of premature failure is either using the wrong cleaning products or neglecting cleaning altogether.
Warning Signs Your Macerator Pump Needs Cleaning
Macerator pumps don't usually give up without warning. These are the most common indicators that a clean is overdue:
- Slow or sluggish flushing — the bowl takes longer than usual to empty after flushing
- Persistent odours coming from the toilet or from the area around the pump unit itself
- Longer pump run times — the pump runs noticeably longer before switching off, a sign of reduced flow caused by scale or residue
- Gurgling sounds from the pipe after flushing, which can indicate partial blockage in the discharge line
- Visible mineral deposits — white or grey limescale around the base of the unit, especially in hard-water areas
- Erratic pump cycling — the pump cycles on and off abnormally during normal flushing, rather than completing a smooth, continuous cycle as it normally does
If none of these symptoms are present, a routine clean every one to three months is sufficient to keep the system healthy. If several are present, a thorough clean followed by a descaling treatment is the recommended first step before assuming a mechanical fault.
How to Clean a Macerator Pump: Step-by-Step
The cleaning method described below works entirely through the toilet bowl — you do not need to open the pump casing, remove any pipework, or use specialist equipment. The process is safe, straightforward, and suitable for all leading macerator brands including Simple Project and all leading macerator brands including Saniflo, Grundfos, and Liberty Pumps.
Step 1 — Turn Off the Power Supply
Switch off the macerator at its dedicated isolator switch, or unplug it from the wall socket. This step is non-negotiable before any cleaning or descaling that involves leaving solution to soak inside the unit. This prevents the pump from activating automatically and pumping out the cleaning solution.
Step 2 — Add a Macerator-Safe Cleaning Solution
With the power off, pour a macerator-safe cleaning product or a diluted white vinegar solution directly into the toilet bowl. Approximately 200 ml of solution is sufficient for a standard clean. The liquid will drain naturally through the trap and into the pump chamber, where it begins breaking down organic residue and light deposits.
For routine cleans, the following products are safe to use:
- Dedicated macerator cleaner (e.g. Saniflo Descaler, Thetford Cassette Tank Cleaner, or own-brand equivalents)
- White vinegar diluted with warm water at a 1:1 ratio
- Mild biological toilet cleaner without bleach or aggressive solvents
✔ Tip: For a more detailed guide on what products are safe and how to use them, see our full blog: What Can I Use to Clean a Macerator Toilet?
A complete list of safe and unsafe products is covered in the dedicated section below.
Step 3 — Allow the Solution to Soak
Leave the cleaning solution inside the pump chamber with the power off. For a routine clean, 30 to 60 minutes is typically sufficient. For heavier buildup, persistent odours, or systems that haven't been cleaned in several months, allowing the solution to soak for 1–2 hours can provide a more effective clean.
The extended contact time allows the solution to break down biofilm, dissolve light mineral deposits, and neutralise the bacteria responsible for odour. Do not flush or restore power during this period.
Step 4 — Restore Power and Flush
Turn the power back on and flush the toilet normally. The pump will activate and circulate the cleaning solution through the internal chamber and the discharge pipe. Listen to the pump cycle: it should run at a consistent pitch and switch off cleanly when the chamber has emptied.
If the pump sounds laboured, runs unusually long, or does not switch off within its normal cycle time, repeat the cleaning process or proceed to the descaling treatment described in the next section.
Step 5 — Flush Through with Clean Water
Flush the toilet two or three additional times using clean water only. This rinses the pump chamber and discharge pipe free of any remaining cleaning solution, preventing chemical residue from sitting in contact with seals and rubber components between cleans.
The system should now run quietly and efficiently, with noticeably improved flush performance and no odour. If problems persist after this full process, a targeted descaling treatment is the recommended next step.
How to Descale a Macerator Pump
Descaling is a more intensive treatment specifically targeted at limescale — the calcium and magnesium deposits left by hard water. In areas where water hardness exceeds 200 mg/l, scale can accumulate inside the pump chamber, on the blades, and within the discharge pipework fast enough to cause noticeable performance issues within a few months.
Standard cleaning solutions are not always sufficient to dissolve heavy limescale. A dedicated descaler is typically formulated with mild acids — such as citric or lactic acid — to break down calcium deposits while remaining safe for the pump's internal components when used as directed.
How to descale a macerator pump:
- Turn off the power supply to the pump.
- Pour 200–500 ml of macerator-safe descaler (following the product instructions), or 500 ml of undiluted white vinegar, into the toilet bowl.
- Leave it to soak for a minimum of 1–2 hours. For heavy scale buildup, an overnight soak is more effective (following the product instructions).
- Restore power and flush the toilet to activate the pump and flush out loosened scale.
- Flush two more times with clean water to rinse the system thoroughly.
For most U.S. households, descaling every 3–6 months is typically sufficient. In hard-water regions — such as parts of the Midwest, Southwest, and areas with high mineral content like Texas, Arizona, and Southern California — more frequent descaling every 2–3 months can help prevent significant buildup.
You can check your local water hardness level using resources like the U.S. Geological Survey or by visiting your municipal water supplier's website.
Products to Avoid in a Macerator Toilet
Using the wrong product is one of the most common causes of premature macerator pump failure. The issue isn't just about what the cleaner does to limescale — it's about what it does to the rubber seals, plastic housing, and metal blade components inside the pump.
| Product to Avoid | Why It's Harmful |
|---|---|
| Chemical drain cleaners / unblockers | Highly corrosive to rubber seals and internal pump components |
| Strong acid-based cleaners | Permanently damages the pump chamber lining and blades |
| Concentrated or undiluted bleach | Degrades seals and rubber parts over time; causes premature wear |
| Thick gel toilet cleaners | Coats moving parts; can clog narrow discharge pipes |
| In-cistern bleach tablets | Continuously expose the pump to chlorine, accelerating wear |
| Wipes (including “flushable” brands) | Do not dissolve; jam rotating blades and cause blockages |
If you're unsure whether a product is safe, the simplest rule is to check whether it's specifically marketed as macerator- or septic-tank-safe. When in doubt, white vinegar or citric acid solution are the safest fallback options.
How Often Should You Clean a Macerator Pump?
Cleaning frequency depends on how heavily the toilet is used, the hardness of your local water supply, and whether the system has any connected fixtures (such as a basin or shower). The following schedule applies to a typical household installation:
| Frequency | Task |
|---|---|
| Weekly | Light toilet bowl clean with macerator-safe cleaner |
| Every 1–3 months | Full 5-step system clean (as described in this guide) |
| Every 3–6 months | Descaling treatment — more frequently in hard-water areas |
| Annually | Visual inspection of the unit, seals, and discharge pipe for wear |
Homes where the macerating toilet is a primary bathroom used by multiple people daily should lean toward the more frequent end of each range. Holiday homes or infrequently used en-suites can clean less often, but should always run a full clean-and-flush cycle after a period of non-use before returning the system to regular service.
Tips to Keep Your Macerator Pump Running Smoothly
Correct day-to-day use reduces the rate of buildup and extends the interval between deep cleans. The following habits are worth adopting as standard practice:
- Only flush standard toilet tissue that breaks down quickly in water — avoid 'extra-thick' or quilted varieties that take longer to dissolve
- Never flush wipes, even those labelled 'flushable' — they do not break down inside the macerator and are a leading cause of blade jams
- Keep sanitary products, cotton wool, cotton buds, and paper towels out of the toilet
- Do not pour cooking grease, oils, or food waste down connected sinks — these solidify in the discharge pipe and cause blockages
- Avoid running the pump when the chamber is nearly empty — always ensure there is sufficient water before flushing
- If the toilet is unused for more than two weeks (holiday periods, seasonal properties), run a full cleaning cycle before returning it to normal use
✔ Pro tip
Some macerator manufacturers recommend adding a small amount of descaling solution to the toilet bowl once a month and leaving it overnight — power off, toilet unused. This micro-maintenance approach significantly reduces the frequency of heavier cleans and is particularly effective in hard-water areas.
Frequently Asked Questions
Can I use bleach to clean a macerator pump?
Occasional light use of diluted bleach in the toilet bowl is unlikely to cause immediate damage, but regular use degrades rubber seals and internal components over time. Concentrated or undiluted bleach, and in-cistern bleach tablets that continuously release chlorine, should be avoided entirely. Macerator-safe cleaners or white vinegar are safer and equally effective alternatives.
How long should I leave cleaner in the macerator pump?
For a standard clean, 30–60 minutes is sufficient. For heavier buildup, odour problems, or descaling treatment, allowing the solution to soak for 1–2 hours — or overnight if permitted by the product instructions — with the power switched off gives the solution more time to work and produces noticeably better results.
Do I need to open up the macerator pump to clean it?
No. Routine cleaning and descaling is done entirely through the toilet bowl without opening the unit. Opening the casing is only necessary for mechanical repairs or blade inspection, and should only be carried out by a qualified plumber or the unit's service team if the pump is still under warranty.
Why does my macerator pump still smell after cleaning?
Persistent odour after cleaning usually indicates one of three things: heavy biofilm buildup that requires an extended overnight soak with a biological cleaner, scale accumulation that requires a dedicated descaling treatment, or a partial blockage in the discharge pipe. If a thorough clean and descale does not resolve the smell, the discharge pipe should be checked for obstruction.
Can I use vinegar to clean a macerator pump?
Yes. White vinegar is one of the safest and most effective options for both routine cleaning and descaling. Use undiluted vinegar for descaling (leave it to soak for at least 1–2 hours), or diluted 1:1 with warm water for general maintenance cleans.
How do I know if my macerator pump is blocked rather than just dirty?
A dirty pump typically shows gradual performance decline — slower flushing, mild odour, longer run times. A blockage usually presents more suddenly: the pump runs continuously without switching off, the toilet does not flush at all, or water backs up into the bowl. A blockage should be investigated promptly to avoid motor burnout.
Conclusion
Cleaning a macerator pump is a straightforward, low-effort maintenance task that pays dividends in system longevity and day-to-day performance. The five-step process — power off, add solution, soak, flush, rinse — takes under an hour and requires nothing beyond a suitable cleaner and a working toilet.
Combine that with a descaling treatment every three to six months, the correct products, and sensible flushing habits, and a well-maintained macerating toilet system should operate reliably and odour-free for well over a decade.
If problems persist after following this guide — unusual noises, the pump not switching off, or water backing up — it's worth consulting the manufacturer's troubleshooting guidance or contacting a plumber, as these symptoms can indicate a mechanical fault rather than a maintenance issue.