


When helping customers with their bathroom upgrades, one of the most frequently asked questions we receive is: What size discharge pipe should I use with the macerating toilet system?
It might sound like a small detail, but choosing the right discharge pipe size can make a big difference in your system’s performance and durability.
In this guide, we’ll walk you through how to select a compatible discharge pipe size based on real-world installation scenarios—using the SNFLEX 600W Macerator Pump as an example—while highlighting how our pump’s flexible rubber outlet design makes connection simpler and more adaptable.

1. Why Pipe Size Matters for a Macerating Toilet
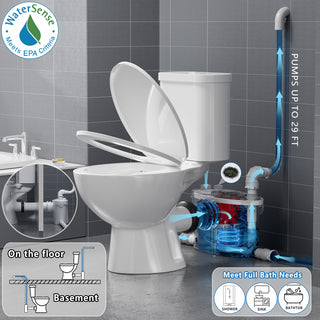
Unlike standard gravity-based toilets, upflush systems use a pump to discharge waste under pressure. This means the discharge pipe must provide a secure, sealed, and appropriately sized path for waste and gray water to exit efficiently.
If the pipe is too narrow, too long, or poorly sealed, it may cause backflow, clogging, or excessive strain on the pump. That’s why understanding pipe size compatibility is essential for a successful and long-lasting installation.
2. Flexible Discharge Outlet Design: Multiple Cuttable Sizes

Simple Project macerator toilet systems come with a rubber check valve discharge adapter designed for versatility. This rubber outlet offers multiple cut-to-fit sizes (9/10", 1-1/10", 1-1/4", 1-7/10") and has natural elasticity to accommodate slight variances in pipe outer diameter.
The connection is secured using a stainless steel clamp and can be further sealed with plumber’s silicone sealant, which is strongly recommended by most professional installers and widely practiced by our customers. This design ensures a snug and reliable fit across a range of common discharge pipes.
3. Compatible U.S. Pipe Sizes & Materials
Our discharge adapter is compatible with several commonly available pipe diameters found at major U.S. hardware stores such as Home Depot and Lowe’s:
- ¾ inch (0.75")
- 1 inch
- 1¼ inch (1.25")
Please note: while these sizes are popular, they are not the only ones that can be used. Your final choice should depend on your home's plumbing layout, existing pipe connections, and installation needs.
Recommended pipe materials include:
- PVC (Polyvinyl Chloride)
- CPVC (Chlorinated PVC)
- Copper
These materials offer strong resistance to pressure and corrosion, making them well-suited for use with macerating systems. We also recommend installing a ball valve in the discharge line to allow for future maintenance, and ensuring the discharge pipe is properly supported throughout its length.
4. Pipe Size Differences in Real-World Use
Each pipe size performs slightly differently in real-world scenarios. Here’s how they typically compare:
-
¾ inch (0.75") pipe
Ideal for shorter discharge routes and compact installations. The smaller diameter increases water velocity, which helps reduce buildup inside the pipe. Proper sealing and stable support are especially important when using this size. -
1 inch pipe
A versatile option suitable for most residential layouts. It supports moderate distances and can accommodate gentle elevation changes or a few bends in the route. Offers more flexibility during installation. -
1¼ inch (1.25") pipe
Best for more complex drainage setups—such as those involving multiple connected fixtures, longer horizontal runs, or multiple vertical lifts. The wider diameter helps reduce back pressure and optimize pump performance.
When selecting pipe size, consider:
✅ Compatibility with your existing plumbing
✅ Required vertical and horizontal discharge distances
✅ Number of bends and ability to maintain proper slope
✅ Whether multiple fixtures share the same drain line
📌 Pipe size is not about “bigger is better” or “smaller saves space.” It’s about choosing the right fit for your layout to ensure smooth, compliant, and reliable waste discharge.
5. Installation Tips: Best Practices for Discharge Pipe Setup
Basic Installation Recommendations:
- Prioritize using straight pipe runs and minimize the number of elbows and joints.
- Seal all joints with plumber’s sealant and secure with stainless steel clamps for a reliable, leak-proof connection.
- Install pipes with a slight downward slope of approximately ¼ inch per foot to prevent waste buildup.
- Always follow local plumbing codes, including requirements for venting or auxiliary pumps if applicable.
Advanced Recommendations:
- Keep the first horizontal run under 9.8 feet before transitioning to a vertical discharge pipe.

- Ensure the discharge pipe terminates into a main sewer line or septic tank—discharging into an open drain or surface runoff is prohibited.
- Use two 45° elbows instead of a single 90° elbow to reduce hydraulic resistance and back pressure.

- For systems with multiple discharge points, each should independently connect to the main sewer line to avoid cross-flow or backflow issues.

- If the vertical lift exceeds 9 feet, install an anti-siphon valve at the highest point or increase the pipe diameter to prevent siphoning.
- Ensure proper two-way ventilation; avoid relying on mechanical or Studor-type one-way air admittance valves that may restrict airflow.
- In freezing conditions, insulate exposed pipes with foam insulation, drain the system when not in use, or use plumbing-safe antifreeze to prevent damage.
6. Conclusion: Choose the Right Pipe for Long-Term Performance
The key to a reliable macerating toilet installation lies in selecting a discharge pipe that suits your unique setup. Our flexible rubber outlet supports a range of pipe sizes and materials, allowing you to adapt to your space without compromise.
When combined with thoughtful pipe layout, quality sealing, proper support, and adherence to local plumbing codes, your system will deliver smooth operation and durability for years to come.
Upflush Toilet Discharge Pipe Size FAQs
Q: Can I use a ¾" pipe with an upflush toilet?
A: Of course.
Q: Do I need a vent pipe?
A: Our units include internal venting with activated carbon, so an external vent pipe is generally not required. However, we always recommend checking with local plumbing codes to ensure compliance.
Q: What pipe material is best?
A: PVC, CPVC, and copper pipes are all compatible, durable, and readily available.
Q: Can I discharge into a floor drain or open channel?
A: No. The discharge must be directed into a proper sewer or septic line.
Q: What’s the maximum horizontal run before a vertical lift?
A: The first horizontal section should not exceed 9.8 feet before turning upward into a vertical discharge.
Q: Do I need a check valve, or is it included?
A: It's included.
Simple Project
Absolutely! The built-in activated carbon filter makes things much easier for projects where external venting isn’t possible. But if you prefer an external vent pipe, the method is just as you described. For more details on how to connect the vent pipe, feel free to contact us or check out our another article, along with an installation guide video. 👉 https://simpleprojectus.com/blogs/blog/how-to-vent-a-macerating-toilet
Joe
If I buy a unit mixbubole with an internal carbon filter, can I change the vent to outside? Is there just a cap on it that comes off for me to put my external vent pipe on?